Introduction
I installed Openldap and freeradius on one (virtual) server and WiKID on another. We believe that this separation of duties is good security policy. It also makes the setup easier because both WiKID and Freeradius listen on port 1812 of the localhost. Both servers are running Centos5.
Installing WiKID
WiKID is dual-source, on-premises two-factor authentication solution. WiKID uses public-private key encryption in software tokens instead of shared secrets like most 2FA solutions for extra security. The Enterprise version is free for 5 users, highly-scalable, reliable and secure.
If you haven't yet done, download the free trial of the WiKID Strong Authentication Server, Enterprise Edition.
Configuring OpenLDAP
yum install openldap* freeradius* freedradius-ldap
To add a test user to OpenLDAP, I created an ldif file, test.ldif. I had already added users previously, so I commented out the first 3 lines.
#dn: ou=People,dc=wikidsystems,dc=com
#ou: People
#objectClass: organizationalUnit

dn: uid=test,ou=People,dc=wikidsystems,dc=com
uid: test
cn: Test Guy
displayName: Test Guy
givenName: Test
sn: Own
objectClass: inetOrgPerson
userPassword: mypassword
mail: test@wikidsystems.com
dialupAccess: yes
Note the last line for dialupAccess. This field will be used by Freeradius to determine if the user is allowed to login.
Here is the contents of the slapd.conf file:
include		/etc/openldap/schema/core.schema
include		/etc/openldap/schema/cosine.schema
include		/etc/openldap/schema/inetorgperson.schema
include		/etc/openldap/schema/nis.schema
include		/etc/openldap/schema/misc.schema

allow bind_v2

pidfile		/var/run/openldap/slapd.pid
argsfile	/var/run/openldap/slapd.args

database	bdb
suffix		"dc=wikidsystems,dc=com"
rootdn		"cn=root,dc=wikidsystems,dc=com"
rootpw          {SSHA}mM7fsBarApAwbnMKXxNh+fXQ1OYppFY9
password-hash   {SSHA}

directory	/var/lib/ldap

index objectClass                       eq,pres
index ou,cn,mail,surname,givenname,displayName eq,pres,sub
index uidNumber,gidNumber,loginShell    eq,pres
index uid,memberUid                     eq,pres,sub
index nisMapName,nisMapEntry            eq,pres,sub
index default                           sub
Add the network client to /etc/raddb/clients.conf. This entry would be for your VPN or website or whatever service to which the user is authenticating.
client 192.168.0.120 {
#       # secret and password are mapped through the "secrets" file.
        secret      = testing_secret
#       shortname   = liv1
#       # the following three fields are optional, but may be used by
cw#       # checkrad.pl for simultaneous usage checks
#       nastype     = livingston
#       login       = !root
#       password    = someadminpas
}
Freeradius will proxy the authentication requests for the dialupAccess users to the WiKID server. Create an entry in /etc/raddb/proxies.conf (NB: apparently this file is now called proxy.conf.)
Proxy - the WiKID server:
realm NULL {
        type            = radius
        authhost        = 192.168.0.100:1812
        accthost        = localhost
        secret          = testing_secret
}
Configuring Freeradius
In /etc/radius.conf add the following to allow proxy requests, enable ldap authorization, and pap authentication.
First configure ldap:
        # Lightweight Directory Access Protocol (LDAP)
        #
        #  This module definition allows you to use LDAP for
        #  authorization and authentication.
        #

	ldap {
		server = "localhost"
		basedn = "dc=wikidsystems,dc=com"
		filter = "(uid=%{Stripped-User-Name:-%{User-Name}})"

		start_tls = no


      access_attr = "dialupAccess"

		dictionary_mapping = ${raddbdir}/ldap.attrmap

		ldap_connections_number = 5

		edir_account_policy_check=no
		timeout = 4
		timelimit = 3
		net_timeout = 1

	}
Note the use of access_attr = "dialupAccess". Next add ldap under authorize:
authorize {
	preprocess
	chap
	mschap
	suffix
	eap
	files
	ldap
	pap
}
Make sure that PAP is a supported authentication type:
authenticate {
	Auth-Type PAP {
		pap
	}

	Auth-Type CHAP {
		chap
	}

	Auth-Type MS-CHAP {
		mschap
	}

	unix
	eap
}
Configuring the WiKID Strong Authentication Server
Now that we've configured Freeradius to proxy authentications, we need to configure WiKID to accept them. See the WiKID installation manual for the details on how to install and configure the WiKID server. Here we're just going to be adding a radius network client for Freeradius:
Log into the WiKIDAdmin web interface:
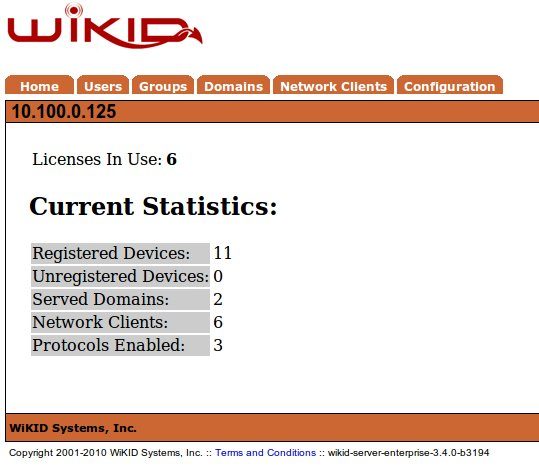
Click on the Network Clients tab:
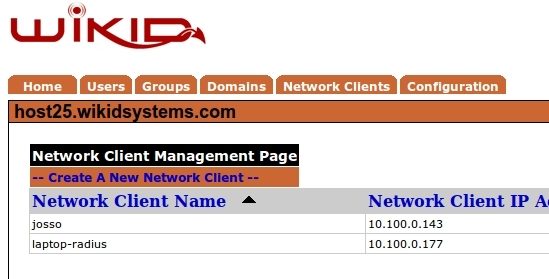
Click on "Create New Network Client". Give the Network Client a name, specify the IP address, select Radius as the protocol and choose which WiKID Domain to use. (WiKID domains hold the users and specify certain security parameters such as PIN length, the lifetime of the one-time passcodes, max bad PIN/passcode attempts, etc.)
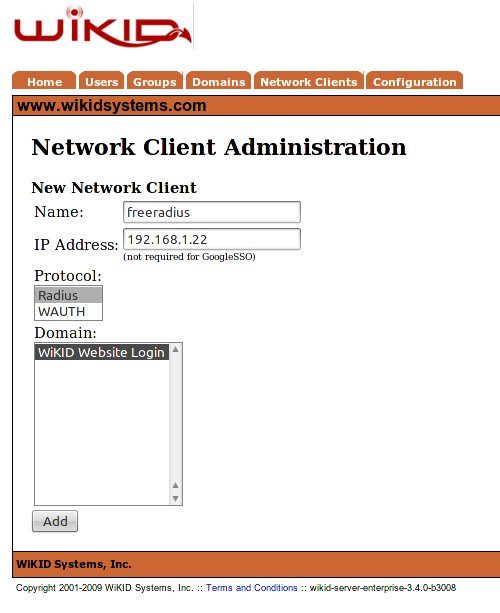
Click Add
On the next page, enter the Shared Secret. This is the same secret you entered in NPS above in the second tab of the 'Add Radius Server' step on the NPS. Be sure these match! WiKID support adding radius return attributes at the Network Client level and on a per-user group level, however, that is beyond the scope of this document.
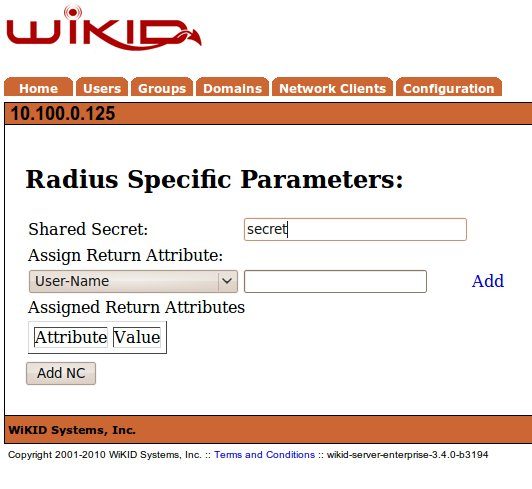
You will get a notice that the network client has been added. You will need to restart the WiKID server from the command line. This loads the network client into the radius interface and opens the radius ports on the built-in WiKID firewall:
# wikidctl restart
Running the WiKID Software token
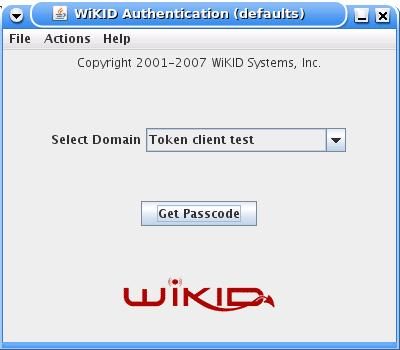
Start the WiKID token and select the Domain associated with the SSH Gateway:
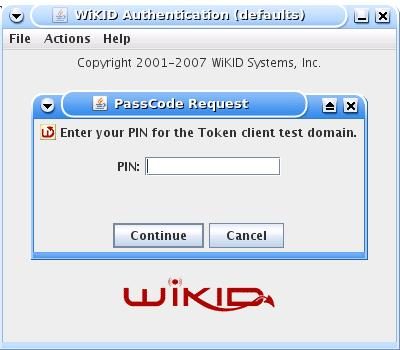
Enter the PIN:
And you will get back the one-time passcode. The OTP is time-bounded, but the time can be set on the WiKID server to whatever you want:
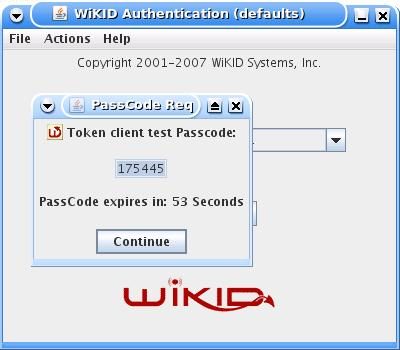
The user simply enters the one-time passcode when prompted by SSH.
The token can also be run from the command line, which is quote convenient for SSH:
java -cp jWiKID-3.1.3.jar:jwcl.jar com.wikidsystems.jw.JWcl domainid
Where domainid is the 12 digit domain identifier.
Conclusion
OpenLDAP and Freeradius are great open-source projects. It should be noted that since we are adding two-factor authentication using the standard Radius protocol a similar setup can be constructed with other LDAP and Radius solutions. That's the benefit of standards!
The WiKID Strong Authentication System is a very reasonably priced two-factor authentication solution. We invite you to learn more about our technology and architecture and to download and test the Enterprise version.
